TRADES & COMMISSIONS WELCOME
Yep! Bring them on now that the holidays are over! Note me or email Wiremysoul@gmail.com.
Amigurumi for sale :: Jewelery for Sale
I've decided to begin offering up some of my patterns for free to anyone interested in using them.
This pattern is untested. This is how I wrote it as Frank was made the first time. If you would like to test this pattern I'd be grateful. Please reply to this journal with your comments about the pattern. Include any edits/corrections you would like to contribute and a link to your deviation, so I can add a thumbnail of it to this post. Thanks so much in advance!
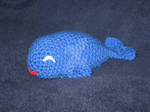
Frank the Whale Pattern
Abbreviations:
R = round or row
sc = single crochet
st = stitch
tog = together (sc 2 tog = decrease)
dc = double crochet
sl st = slip stitch
instructions between * are repeated
R1 - sc 6 in a circle (amigurumi double ring) = 6st
R2 - 2 sc in each st around = 12 st
R3 - *sc 1, 2 sc in next st* = 18 st
R4 - *sc 2, 2 sc in next st* = 24 st
R5 - *sc 3, 2 sc in next st* = 30 st (If using beads for eyes, crochet them in along this row on either side of the face)
R6 to R12 - sc around = 30 st (If using safety eyes, insert them after you've made enough fabric to support the washers)
R13 - *sc 6, sc 2 tog* = 26 st
R14 - *sc 5, sc 2 tog* = 22 st
R15 - sc around = 22 st
R16 - *sc 5, sc 2 tog* = 19 st
R17 - sc around
R18 - *sc 4, sc 2 tog* = 16 st
R19 - sc around = 16 st
R20 - *sc 3, sc 2 tog* = 12 st
R21 to R22 - sc around
Stuff the whale fully now, leaving enough space at the tail to press it flat between your fingers.
Tail:
Press the tail closed flat, then sc it shut with 6 sc for R1.
R2 - chain 2, dc 2, sl st 2, dc 2, turn.
R3 - chain 2, 2 dc in each of next 2 st, sc, chain 1, 2 dc in next 2 st, turn
R4 - chain 2, 2 dc in each of next 3 st, sc in middle-most stitch post hole, chain 1, 2 dc in last 3 st, (skipping any between middle and last 3)
slip stitch, cut yarn and pull through loop to bind off, weave in end.
Fins (make 2):
Chain 5
sc in 2nd ch from hook, and sc to end. Turn.
sc along other side to end.
3 sc in end stitch.
sc along to end. sl st final stitch, cut and pull through loop to bind off, leaving enough of a tail to sew fin to body where desired. Weave in ends.
Cut out felt facial features if you didn't use beads or safety eyes, and paste them on with speed sew or sew them on.
Take a look at my clubs!
Stamps I love today:
:thumb58200634:
:thumb110171718:
ShopDreamUp AI ArtDreamUp
Journal 27 - New vids and a book review
I'm a bad deviant. I haven't posted in a while. I am excited to tell you about my new partnership with AllFreeCrochet.com though! They offered to pay me to make some crochet videos for them, and I recently uploaded Episode Two of a short series I'm making for them called Creating Amigurumi! Cool, huh?
You can find them on my channel at YouTube as well as AllFreeCrochet's channel.
Creating Amigurumi Episode #1 -- Jan demonstrates The Magic Loop and Amigurumi Double Ring Methods of beginning to crochet in the round.
Creating Amigurumi Episode #2 -- Jan demonstrates crochet in the round with single crochet increases.
By the end of the series
Amigurumi Easter Egg - Free Pattern
:thumb159297820:
Amigurumi Easter Egg
See this demonstrated on YouTube: http://www.youtube.com/watch?v=M8cqr3o0qp8
Materials:
Red Heart Comfort sport in two colours of your choice.
Hook: F (3.75 or 4 mm)
Abbreviations:
R = round or row
sc = single crochet
st = stitch
tog = together (sc 2 tog = decrease)
sl st = slip stitch
instructions between * are repeated
R1 - sc 6 in a circle (amigurumi double ring) = 6st
R2 *sc 1, 2 sc in next st* = 9 st
R3 - *sc 2, 2 sc in next st* = 12 st
R4 - *sc 3, 2 sc in next st* = 15 st
R5 - *sc 4, 2 sc in next st* = 18 st
R6 - *sc 5, 2 sc in next st* = 21 st
R7 - *sc 6, 2 sc in next st*
Journal 26 - Jewelery Feature 4
Since I finally set up two new boxes on my profile page that feature my recent favourite amigurumi and jewelery, I won't post these journal features as often, but I wanted to point out a few recent faves to my friends who might not have visited recently, but would read this. XD
:thumb125996593:
by getpersonalart (https://www.deviantart.com/getpersonalart). I have zero experience with laser etching, but this made me want to learn more about it! I found this cuff just freaking brilliant. The colours are incredible, they look luminescent!
:thumb112411541:
by hogret (https://www.deviantart.com/hogret) . hogret (https://www.deviantart.com/hogret) said she made this to help her feel creative on days she doesn't, and I can see why. Firstly, I'm
Journal 25 - Studio-Making
Today on my blog:
Studio-Making
Over a year and a half ago, I arranged a nice little desk in my basement laundry room to serve as my jewelery-making 'studio' space. It worked well enough in the summer when I wanted to escape to the cool basement to create. In the winter, well.. I could always wear polar fleece (I practically live in fleece in the winter anyway).
We have a small bedroom in the basement that's not being used much, so I decided to make the space a little more useful.
Check out my blog for the rest of the story and pictures, if you like. There's still work to do in there, but I have a place to create, and that makes me feel
© 2009 - 2024 WireMySoul
Comments8
Join the community to add your comment. Already a deviant? Log In
Unfortunately, once you hit the decreases, this pattern crashes. Basic maths and logic disagree with this pattern! (Spock helped? Heh heh.) Row 13, Single Crochet 6 stitches and then join the 7th and 8th together? This will mean you may only decrease by 3, meaning you should be left with 27, not 26 stitches. And even if by act of confundulus you did end up with 26 stitches, decreasing in row 14 by crocheting every 6th and 7th stitch together will still not get you 22 stitches. It will get you 23. Which means the only way to get to 19 stitches in row 16, is by performing TWO decreases at the very end of the row, which is messy as hell. You can get 16 stitches in row 18, though you have one lone single crochet at the end of the row after your last decrease to get there. But then, it is impossible to end up with 12 stitches in row 20 from that 16, as you only allow for three decreases, and there is that one little lone stitch on the end again. Messy. And frustrating.
But, don't despair, you can fix this easy enough! I can see why you want a decrease of 4, not 6, in row 13. You want an ellipse, with a fatter, shorter front, and a longer tapering back. So, sticking with the 4 decrease, this is how you would go about it.
Row 13: sc4, sc2tog, sc5, sc2tog, sc4, sc2tog, sc5, sc2tog, sc4: 26 stitches
Row 14: sc3, sc2tog, sc4, sc2tog, sc4, sc2tog, sc4, sc2tog, sc3: 22 stitches
Row 15: sc around :22 stitches
Row 16: sc3, sc2tog, sc3, sc2tog, sc2, sc2tog, sc3, sc2tog, sc3: 18 stitches
Row 17: sc around
Row 18: *sc2, sc2tog* 4 times, sc2: 14 stitches
Row 19: sc around
Row 20: sc2, sc2tog, sc6, sc2tog, sc2: 12 stitches
I then slipped stitched across 4 stitches to put me on the 'side', not my 'bottom', before stuffing and sc my 12 into 6. The tail worked beautifully, and the end product was easy to shape to be a little flat on the bottom and nice and rounded all the way down with a nice jaunty little tail. Mine was done on a .6mm hook with Gutermann thread for one of my small dollies, and he is just gorgeous. Overall, a fairly good pattern that will give you a pretty little whale, if you can overcome those nasty decreases!